
A Step-by-Step Guide to Install a Metal Roof
Installing a metal roof is an excellent investment for homeowners looking for durability, energy efficiency, and a long lifespan. Unlike traditional asphalt shingles, metal roofs are known for their ability to withstand harsh weather, resist fire, and reflect heat, making them popular in both residential and commercial properties. However, installing a metal roof requires precision and attention to detail, whether you’re hiring a contractor or doing it yourself.
This article will walk you through the step-by-step process of how to install a metal roof, covering essential materials, tools, and best practices to ensure a successful and long-lasting installation.
Key Points to Consider Before Installing a Metal Roof
- Types of Metal Roofing
- Preparation and Safety
- Step-by-Step Installation Process
- Common Mistakes to Avoid
- Cost Breakdown and Time Considerations
1. Types of Metal Roofing
Before starting any roofing project, it’s essential to choose the right type of metal roofing for your home. Metal roofing comes in various materials, styles, and finishes. Here are some of the most common options:
Materials:
- Steel: The most common metal roofing material, known for its durability and affordability. Steel roofs are often coated with zinc or aluminum to prevent rust.
- Aluminum: Lightweight and resistant to corrosion, making it ideal for coastal regions with salty air.
- Copper: A premium material that develops a distinctive patina over time. Copper roofs are long-lasting but come at a higher price.
- Zinc: Known for its ability to self-heal minor scratches, zinc is another premium material often used in architectural applications.
- Tin: Less common today but still used in some older homes or for specific design aesthetics.
Styles:
- Standing Seam: The most popular style for residential metal roofs, featuring raised seams where panels join together. These seams lock together to create a watertight seal.
- Corrugated Metal: Wavy or ridged metal panels that are commonly used in agricultural or industrial settings but are increasingly found in residential applications.
- Metal Shingles: Designed to look like traditional asphalt or wood shingles, offering the aesthetic of other materials with the durability of metal.
2. Preparation and Safety
Before you begin, it’s important to ensure that you have the proper tools and materials. Roofing is a complex project that requires careful planning, so follow these steps to prepare:
Essential Tools and Materials
- Metal roofing panels (based on the roof size)
- Underlayment (synthetic or felt)
- Fasteners (screws, nails, etc.)
- Ridge cap
- Metal flashing for valleys, chimneys, and vents
- Metal snips
- Measuring tape
- Chalk line
- Cordless drill and screwdriver bits
- Safety harness and hard hat
- Ladder
- Gloves and safety glasses
Safety Considerations
- Ladder Stability: Ensure that your ladder is on level ground and securely positioned to prevent falls.
- Harness and Rope: Always wear a safety harness when working on the roof. Anchor the rope securely to prevent slips.
- Protective Gear: Use gloves, a hard hat, and safety glasses to protect yourself from sharp metal edges and debris.
3. Step-by-Step Installation Process
Once you’re prepared with the right tools and materials, you can begin the installation process. Follow these steps carefully to ensure a successful and durable roof installation:
Step 1: Measure and Plan
Before installing the metal roof, measure the roof’s surface area to determine how many metal panels and materials you’ll need. Be sure to account for valleys, ridges, and roof penetrations such as chimneys or skylights.
Step 2: Remove the Old Roof (Optional)
In some cases, you can install a metal roof over existing asphalt shingles. However, if there are too many layers or if the old roof is damaged, it’s best to remove the old roof entirely before installing the new metal roof. Removing the old roof also ensures a smoother surface for installation.
Step 3: Install Underlayment
Lay down the underlayment over the roof decking to provide an extra layer of protection against moisture. Synthetic underlayment is highly recommended because it’s more durable and water-resistant than traditional felt.
- How to Install: Starting at the eaves, roll out the underlayment horizontally, ensuring that each layer overlaps the previous one by at least 6 inches. Secure it to the roof with nails or staples.
Step 4: Install Metal Flashing
Metal flashing is crucial to prevent water from seeping into vulnerable areas of the roof, such as valleys, chimneys, and vents. Install the flashing in these areas before laying down the metal panels.
- How to Install: Secure the flashing with nails or screws, ensuring that the edges overlap and provide complete coverage. Use a caulking gun to seal any joints.
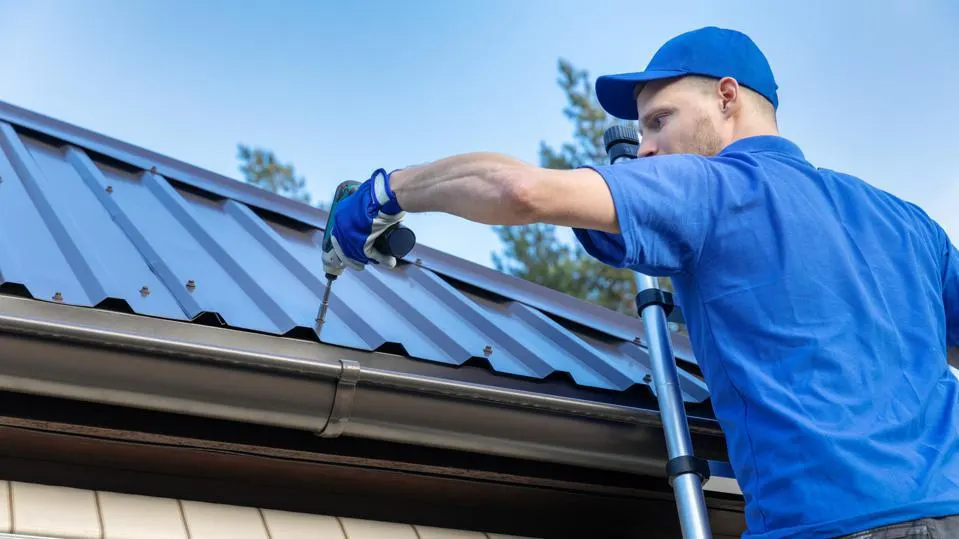
Step 5: Install Metal Panels
Now it’s time to install the metal panels. Begin at the eaves and work your way up toward the ridge. Each panel should overlap the previous one by about 6-8 inches to ensure proper water drainage.
- How to Install: Secure the metal panels using screws, starting from the bottom edge. Place screws along the panel’s ridges (not valleys) to prevent water from pooling around the screws. Follow the manufacturer’s guidelines for proper screw placement, which is typically every 12-24 inches.
Step 6: Install Ridge Cap
The ridge cap is installed at the peak of the roof to cover the seams where the metal panels meet. The ridge cap prevents water and debris from entering the roof.
- How to Install: Place the ridge cap over the peak of the roof, ensuring it overlaps both sides of the roof equally. Secure it with screws along the edges of the ridge.
Step 7: Install Metal Trim
Finish the installation by adding metal trim around the edges of the roof, including the eaves and gables. The trim not only adds a finished look but also provides additional protection against water penetration.
- How to Install: Secure the trim with screws or nails, ensuring that the trim overlaps the edges of the metal panels.
4. Common Mistakes to Avoid
Metal roof installations require precision and attention to detail. Avoid these common mistakes to ensure a long-lasting, leak-free roof:
- Improper Screw Placement: Placing screws in the valleys instead of the ridges can lead to water pooling around the fasteners, causing leaks.
- Insufficient Overlap: Failing to overlap panels and flashing adequately can allow water to penetrate the roof, leading to leaks.
- Skipping the Underlayment: The underlayment is a critical layer of protection against moisture. Skipping it can result in long-term water damage.
- Cutting Panels Incorrectly: Use metal snips or a power shear to cut panels to size. Avoid using tools that could create jagged edges or damage the panels.
5. Cost Breakdown and Time Considerations
Installing a metal roof can vary in cost depending on the size of the roof, the type of metal, and whether you hire a contractor or do it yourself. Here’s a cost breakdown of a typical metal roof installation:
| Material | Cost per Square Foot | Lifespan |
|---|---|---|
| Steel | $7 – $14 | 40 – 70 years |
| Aluminum | $9 – $15 | 50+ years |
| Copper | $15 – $25+ | 60+ years |
| Standing Seam Roof | $12 – $20 | 50+ years |
| Corrugated Roof | $5 – $10 | 30 – 50 years |
Labor Costs
If you hire a professional roofing contractor, expect to pay between $3,000 and $10,000 for a typical roof installation, depending on roof size and complexity. DIY installation can save on labor costs, but it requires time, expertise, and the right tools.
Time to Install
- DIY: A DIY metal roof installation can take anywhere from 3 to 7 days, depending on the size of the roof and the installer’s experience.
- Professional Installation: A contractor may complete the project in 2 to 4 days, depending on the crew size and weather conditions.
Installing a metal roof is a significant investment that provides long-term benefits in durability, energy efficiency, and aesthetics. Whether you’re taking the DIY approach or hiring a contractor, following the proper installation steps is crucial to ensure your roof lasts for decades.
With proper preparation, accurate measurements, and careful attention to detail, a metal roof can be installed efficiently, offering both protection and visual appeal to your home. Choose the right material and style that best fits your home’s needs, and consider consulting with a professional if you’re unsure about any part of the installation process.
Essential Equipment Required for Installing a Metal Roof
Installing a metal roof is a complex process that requires specialized tools and equipment to ensure a safe, efficient, and durable installation. Whether you’re a seasoned contractor or a DIY homeowner, having the right tools is crucial for a successful project. Below is a detailed list of the equipment you’ll need, categorized into key areas of the installation process: preparation, cutting, fastening, safety, and finishing.
1. Measuring and Layout Tools
Before you even begin laying down metal panels, precise measurements are necessary to ensure the roof is properly aligned and materials are cut to the right size. Here’s the essential measuring and layout equipment you’ll need:
- Measuring Tape: A good-quality, long measuring tape (at least 25 feet) is necessary to measure roof dimensions and metal panels accurately. For larger roofs, a 100-foot tape measure may be useful.
- Chalk Line: Used to mark straight lines across the roof decking, a chalk line is essential for aligning panels and fasteners accurately. It ensures that your metal panels are placed in straight rows and avoids uneven spacing.
- Square or Speed Square: This triangular tool helps you mark and verify 90-degree angles, ensuring that cuts and panel placements are square to the edges of the roof.
- Level: A long level (at least 4 feet) ensures that your roof and panel installation is straight and level. This is important for both the appearance and function of the roof.
2. Cutting Tools
Metal roofing panels will need to be cut to fit the dimensions of your roof, especially around valleys, ridges, chimneys, and vents. Using the right cutting tools ensures clean, accurate cuts without damaging the panels.
- Metal Snips (Tin Snips): Hand-operated metal snips are used for cutting smaller sections of metal panels, flashing, or trim. There are three types of snips for different cutting directions:
- Red-handled snips for left-hand cuts
- Green-handled snips for right-hand cuts
- Yellow-handled snips for straight cuts
- Power Shears: For larger cuts, electric or pneumatic power shears are much faster than manual snips and allow you to cut through thicker panels more easily. Power shears are ideal for long, straight cuts.
- Angle Grinder: An angle grinder with a metal-cutting disc can be used for cutting metal roofing panels, especially for curves or complex shapes. It’s important to choose a thin, high-speed disc for smooth cuts and minimal heat generation.
- Nibblers: A nibbler is a specialized power tool designed to make clean, precise cuts in metal roofing panels. It “nibbles” small pieces of metal as it cuts, creating less heat and fewer sharp edges compared to an angle grinder.
3. Fastening Tools
Metal roofs rely on screws, nails, and other fasteners to hold the panels securely in place. Using the right fastening tools ensures the roof stays watertight and can withstand wind and weather.
- Cordless Drill or Impact Driver: A high-quality cordless drill or impact driver is essential for driving screws into metal panels. Choose one with adjustable torque settings to avoid over-tightening the screws, which can damage the panels.
- Screwdriver Bits: Ensure that you have the correct bits for your fasteners (usually Phillips or hex-head bits). It’s a good idea to have multiple bits on hand to replace any that wear out during the project.
- Roofing Screws with Rubber Washers: Roofing screws are specially designed for metal roofs and come with a rubber washer that creates a watertight seal around the screw. The washer prevents water from seeping into the fastener holes, which can cause leaks.
- Hammer: A basic hammer is needed for installing underlayment and flashing. While many fasteners are screws, some smaller tasks like tacking down underlayment or flashing may require nails and a hammer.
4. Safety Equipment
Roofing is inherently risky, especially when working with metal panels, which can be sharp and difficult to handle. Using the proper safety gear is critical to prevent accidents and injuries.
- Roofing Harness and Lanyard: A roofing harness is essential for working safely on sloped roofs. The harness attaches to a rope and lanyard system, which should be anchored securely to a stable point on the roof to prevent falls.
- Roof Anchor: Used to secure the safety harness, roof anchors are attached to the roof’s frame or trusses and provide a strong, reliable point to tether yourself to while working.
- Work Gloves: High-quality gloves are a must when handling metal panels, which often have sharp edges. Look for gloves that offer both protection and dexterity, such as cut-resistant work gloves.
- Safety Glasses or Goggles: Metal cutting can produce small metal shavings and debris that can fly into your eyes, so protective eyewear is a must.
- Hard Hat: If working on a steep roof or multi-level home, wearing a hard hat protects your head from falling tools or debris, which can cause serious injury.
- Non-Slip Roofing Shoes: Roofing shoes or boots with non-slip soles are important for maintaining grip while walking on metal panels, which can become slippery, especially when wet.
5. Roofing Materials and Supplies
In addition to the tools, you’ll need various materials to ensure the installation is weatherproof and lasts as long as possible.
- Metal Roofing Panels: These are the primary materials for your roofing system. Panels come in different types such as standing seam, corrugated, or metal shingles. Choose the right panel type and material (steel, aluminum, etc.) based on your design needs and local weather conditions.
- Roofing Underlayment: Installed under the metal panels, the underlayment provides an additional layer of moisture protection. You can use either synthetic underlayment or felt, with synthetic being more durable and water-resistant.
- Flashing: Flashing is used around chimneys, vents, valleys, and other roof penetrations to prevent water from entering. It is typically made of metal and is critical to preventing leaks.
- Ridge Cap: The ridge cap is installed at the roof’s peak to cover the seams where the metal panels meet. It prevents water, snow, and debris from entering through the roof’s ridge.
- Metal Trim: Used to finish the edges of the roof, metal trim adds aesthetic appeal and additional protection to the roofing system. This includes eave trim, gable trim, and drip edges.
6. Miscellaneous Tools
There are a few additional tools you may need to ensure the job is done properly:
- Caulking Gun: A caulking gun is used to apply sealant around seams, flashing, and penetrations such as vents and chimneys. This ensures that water does not enter the roof through gaps or cracks.
- Magnetic Sweeper: After installation, it’s important to use a magnetic sweeper to pick up any stray nails or metal pieces from around your home. Metal debris can pose a hazard if left lying around, especially if you have children or pets.
- Ladder: A sturdy extension ladder is needed to access the roof safely. Make sure your ladder is rated for your weight and is long enough to reach the roof with stability.
7. Finishing Equipment
Once the metal roof is installed, there are a few final tools needed to complete the project and ensure it is weather-tight and aesthetically pleasing:
- Sealant: Use a high-quality sealant (such as silicone or polyurethane) to seal areas around flashing, vents, and chimneys, ensuring water cannot penetrate the roof.
- Touch-Up Paint: Metal roofs often come in pre-painted colors. Having a matching touch-up paint on hand allows you to cover any scratches or cuts made during installation, maintaining the roof’s aesthetic appeal and preventing rust.
Conclusion
Installing a metal roof requires a wide range of specialized tools, from basic measuring devices to high-end cutting and fastening equipment. Proper safety gear is also essential, as roofing can be dangerous without the right precautions. Ensuring that you have all the necessary tools on hand will not only make the installation process smoother but will also ensure that the roof is installed properly, providing years of protection and durability.
Whether you’re tackling the project yourself or working with a contractor, having the right equipment is the key to a successful metal roof installation.
